Saturday, March 23, 2013

Things just got a little worse


I'm not talking about the recent snow storm. I'm talking about water damage inside the trailer.
We thought all the water damage was in the front half of the trailer, but while dismantling the master bedroom, I mean bed frame, David found...


...more water damage.
It's not too surprising actually.

And better to find it now. So the demolition stage was extended.


Here it is with the paneling removed,

and here is a wider shot, so you get the full effect.


So that is happening. Meaning, David is out there working on it right now.

David has done 100% of the trailer projects this week. I have been out with the flu. It's an uncomfortable flu.  But today I hope to sew some curtains. My friend Mary loaned me her sewing machine, and I'm ready to go. Thanks everyone at FB Tin Can Tourists for the great replies and posts about your camper curtains.

I wondered (for about 2 seconds) whether there was anyone on Earth who would enjoy seeing all these water damaged interior photos. And after 2 seconds I realized.... TCTs want to see them!  Enjoy.

I'll close with some happy news- David bought an old and beautiful 20 cup coffee percolator for the trailer and it came today! Woot woot, Camper Coffee!

Sunday, March 17, 2013

Carpentry: new framing and cabinet faces

I did finish painting the cabinet doors and drawer fronts, and now I'm fretting about the amount of ruffle that should reside in our camper curtains. HOWEVER the real issues with the Toaster are the kind that require actual skills, like carpentry.  David is on it.

We knew when we bought the camper that it had water damage in the ceiling.  Remember this?

Which was concealing this?

Well the whole ceiling framing and some of the wall framing (along the top) came out, and David has been replacing it with clean, dry, fresh smelling wood.  Recent photo:

Yay! David made great progress on this today.

He's also got some ideas for making the camper cozier, using some woodworking details.  Two specific ideas include building some small ends for the dinette benches, to make it feel like you are in a restaurant booth (this is a mock up, for shape and scale):

AND some decorative scrolling at the base of the cabinets. Actually these are called "face frames."

The old cabinets had to come out so we could get to the water damaged framing, etc.

Details make a difference. Thanks David!

Camper curtains

Some notes about sewing curtains for the Toaster.  First of all, while I learned to sew in 4th and 5th grades, I never really excelled at it. But I do believe I can handle small curtains.  There are just a bunch of straight seams after all.

Here are a few promising web sites with step by step instructions.


http://www.designsponge.com/2010/02/sewing-101-curtains.html
*Measure the length and then add 18 inches for hemming and shrinkage- I think that is for taller windows! but you need to add some amount for hemming, pocket or tabs, and shrinkage.

http://www.trails.com/how_27206_drapes-rv.html
*This one seems more intuitive to me.

http://www.trails.com/how_2914_make-camper-curtains.html
*For flat, simple curtains.


Some things to consider:
- Do we want the curtains to lay flat when they are closed, or should they maintain some amount of gather the whole time?
- Should there be a little ruffle at the top of the curtain? That can be created depending on rod pocket placement.
-Pockets or tabs? If tabs, should they be tab top or back tabs.
-Liner or no liner?

I pinned some examples of different styles over on my Pinterest board.

Going to go spy on some photos of campers on Facebook! See you there.

Friday, March 15, 2013

Cabinet update

David got up really early this morning. This happens sometimes, and when it does, David manages to complete a really impressive amount of work on one ore more projects.


While Miles and I slept, David sanded all the cabinet doors, AND the inside of two drawers that were pretty gross.  Then primed the drawer insides with stain blocker. 
Then moved all the cabinet doors inside the house.

Hours later, Miles and I continued the prep and priming (or is it "primered") the cabinet doors.  This included another TSP "wash" and then putting oil based primer on the fronts of the doors, which are all melamine. It can be hard to get paint to stick to melamine because of the smoothness. But after talking with the Home Depot paint people and some internet checking, we are confident that TSP wash, light sanding, another TSP wash, and the oil based primer will work.  

In other camper news, David made a lot of progress yesterday with re-framing. Most of the wood framing had to come out because of the water damage. Pictures later.

Monday, March 11, 2013

Thinking ahead to COLORS

It's never too early to plan!
So when we were out shopping for 1x4s and such yesterday (to fix the water damage in the ceiling) we checked out some paint chips and even went to a fabric store. I think this is fun.   We're pretty set on the paint; fabrics are still wide open. But we liked these and the kind owner of Selvedge Studio on the Hip Strip (in Missoula) was really nice and cut us tons of samples.  

I found the best blog with instructions on making cushion covers for your camper, AND curtains.  
Thanks, www.outlikebandits.com! 


We are thinking the off white (French Market to be exact) for the drawer fronts and cabinet doors; green (excuse me, French Grey) for the upper cabinet bodies, and brown - no wait- Popcorn Kernel- for the lower cabinet bodies.  Off white again for the walls.  FYI.

And here we go.

Saturday, March 9, 2013

Productive Day

Beautiful warm spring day in Missoula, Montana today.
A perfect day to clean out the water damaged ceiling of one's camper. So we did.
 
That was the view from outside and here's what was happening inside:


My role was clean up and photo-documentation.

Here's the next stage:


There was a lot of rotten framing and wet fiberglass insulation. But no mouse poop! Yay.  
David had to take out the cabinets in the front of the camper in order to get the whole ceiling off and also have room to put in new framing.  But we kept the doors. David will be able to make new cabinets (thanks David!)

It's pretty obvious that this little camper suffered a trauma at some point.  
Perhaps a tree branch fell on it.  Check it out.

This was covered up by piece of aluminum trim, and we weren't at all surprised to find it (since you could see the gist of it even with the aluminum trim). 

BUT we have some issues to figure out, including:

1. What is the best way to re-shape (that is, un-crush) the trailer skin/siding? 
It isn't creased or anything, just not totally straight to where the seams line up.

2.  What is the best kind of caulk (a kind of butyl caulk I assume) or other product to fill up the screw holes that we don't want anymore? Someone went overboard with screws at some point.

3. What about this?
Can you see that the drip line (drip rail?)  is broken? In two ways. First, it is severed along its length (so it was probably one loooong piece back in the day; now it is 2 pieces, poorly mended and now unattached again).

The second is that it has come away from the body. That is why you can see sky through a piece of it. 
I'm pretty sure that means it isn't water tight.

So we are trying to figure out if we should buy an entire new dripline or if there is a way to properly repair just the section that was broken.

Although the forum is dedicated to vintage Shasta Trailers, it helped frame the problem. If you have ever fixed a drip rail and have some insight it would be AWESOME if you left a comment.

And final pic of the day: me doing clean up. I really enjoy the big cleanup after a big day of work.

Made Some Camper Friends!

It turns out that Facebook and the interwebs as a whole are full of friendly people who love to talk about their vintage campers and the process of fixing them!  Last night I got onto the Tin Can Tourist Facebook page and was warmly welcomed.  In fact, about 2 minutes after introducing myself and our camper, Mr Tim Heintz, owner of Heintz Design Vintage Trailers in wrote:

"Great looking trailer, not many Security Traveler Trailers out there! Are you sure about the Size and Year? The Body would be 12' but this model was called the "Fifteen" as in 15' long (Trailers are always measured in overall length). Also 1966 was the first year that the Security Traveler Trailer introduced this "Fifteen" model."


It's fun to get this kind of information. We'd looked around on the internet a bit and hadn't found much. Security campers, including ours, the Security "15" Traveler were made in Boise, Idaho.  

Also learned that we should (and will) become members ot the Tin Can Tourist Club (they have vintage camper rallies all year, all around the country), and learned about some cool supply companies.  Which we'll probably need to contact at some point in during this project.

Friday, March 8, 2013

Before photos

We never take enough "Before" pictures, and always vow that we'll do better next time.  Well the time is now. David took some great pictures of the Toaster today.  I will start with the bad news first:

Serious water damage to the ceiling. This will all come out and David will replace the ceiling, build new framing, and repair the leaky roof.  Suspect that the light fixture on the right is full of water.  At least the weather this weekend is supposed to be nice- a good weekend to work on some spring cleaning.

The good news: the rest of the inside is dry and clean! There will be paint. And slipcovers.

But it's just so cute.

And the master bedroom:
Awesome sauce. Now imagine it with my dog sleeping there.

 I know.

We spent some time this evening looking at some paint combinations.  It's fun to image the possible end product.  There are so many possibilities.


To do list, phase 1

1. I need to learn to drive a trailer. Especially backing up. Mary Jane Butters assures me in all her "Glamping" materials (book, website, etc) that this is nothing to worry about, that it just takes practice. Breathe deeply.

2. Figure out the wiring system that we want. The camper currently has a plug in for 110 V power, but we would like to rig it so that we can run the lights (and outlets) from a 12 V battery. And then the 12 V battery can be charged from a 110 V source ("shore" power), and maybe also eventually from a small solar charger, and maybe also from our truck's battery when we're actually driving somewhere.

Found a good post about this..
http://vintageshasta.proboards.com/index.cgi?board=batteries&action=display&thread=664
So it looks like we will need a converter and a place to put that converter. No big whoop.

2.5 There is propane for the heater and stove; should probably test that.

3. Implement new power system while David rebuilds the roof and ceiling.

4. Help David rebuild the roof and ceiling.  David is a really talented carpenter, woodworker, artist, so I'm excited that we even have the option of buying a fixer-upper and taking on this project.

5.  Decide on a color scheme for re-painting. Right now it is a good example of Griz Nation colors, but that isn't really our style. I think this puppy spent a lot of time tailgating.
We've got some ideas pinned over at Pinterest (http://pinterest.com/wildlifegardenr/camper/).

6.  There might be some garden re-arranging this spring to accomodate the camper. But that's later.


It has begun

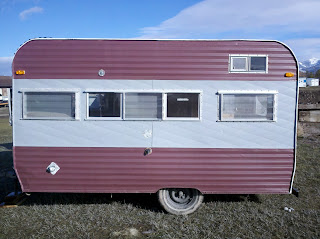
After admiring vintage campers "for other people" and recognizing that sleeping on the ground is becoming less comfortable the older we get, my husband and I took the jump and bought a vintage camper. Here it is.
It's pretty exciting! It looks like a toaster with wheels, and it is going to be adorable. In an appropriately Montana sort of way.  It is a 12 foot 1965 Security Trailer Camper. It does have water damage to the roof and ceiling, but the inside is otherwise REALLY clean.
Sink, icebox style fridge, oven/range. The brown is actually a nice color.
Here's our friend Rob enjoying the first ever coffee break inside the camper.

We are developing a To Do list, and a blog seemed like a good way to track goals, progress, resources and such. We enjoy reading other people's blogs, and I can track some of the most helpful entries here too. And if anyone wants to chat about their vintage camper rehab project, well blogs are a good forum for that!
Stay tuned, camper lovers.