Wednesday, June 19, 2013

People are taking notice!

The exterior transformation is almost complete, and we are getting lots of "Looks good!" and so on from passersby and neighbors. They were probably nervous that the banged up camper we bought in April was going to just sit on the street and decline indefinitely. But it's really looking good!

Before:


 There will be a striped awning on this side- you can see the awning rail.
Notice the eyebrows over the windows, too.  It came with an eyebrow over the door. 
David also added a handlebar to make it easier for me to get in.

And here is the Before of the front and driver side.

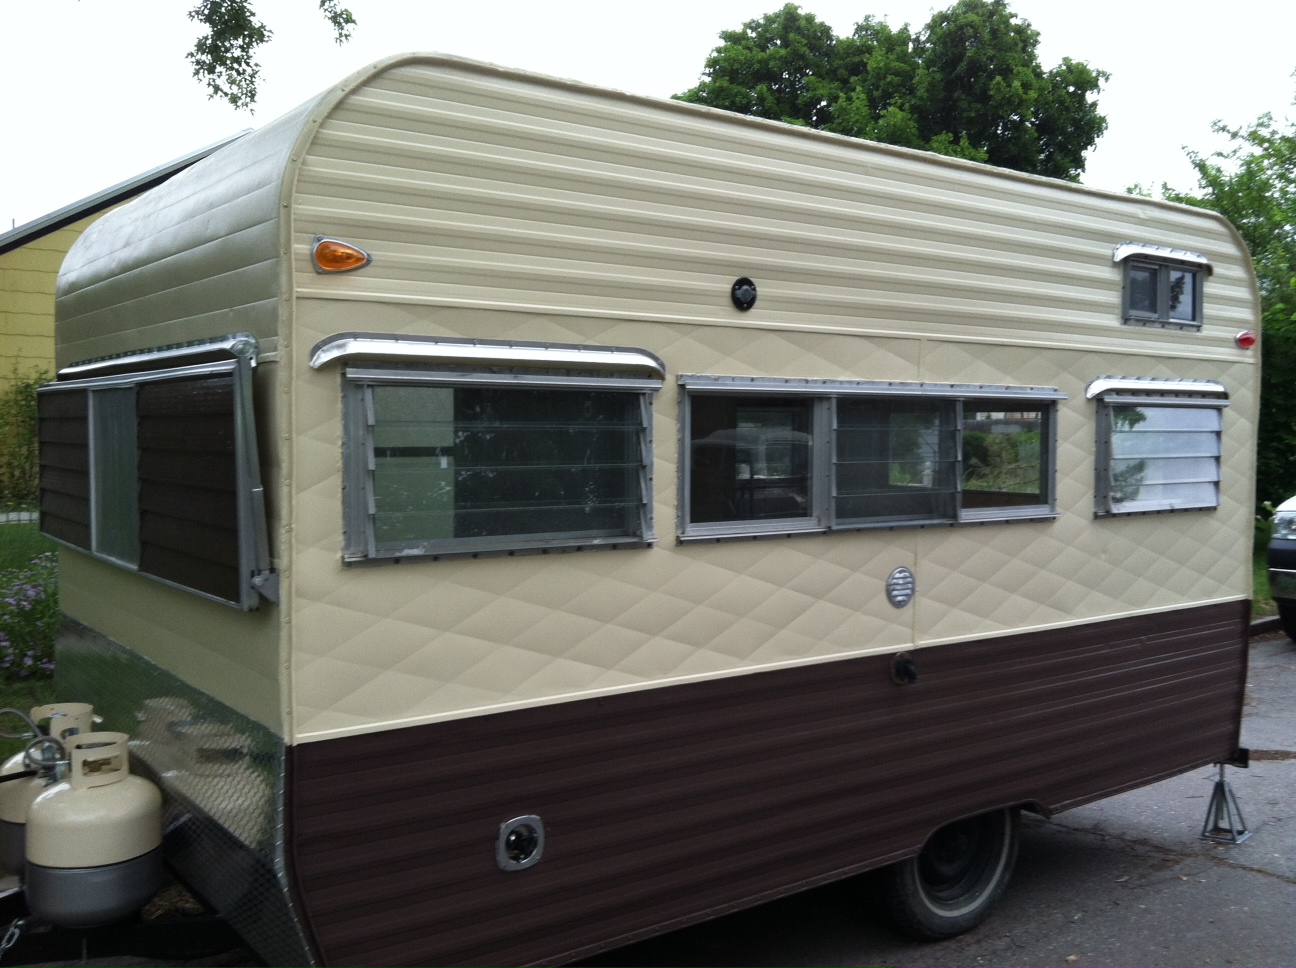
After- again notice the eyebrows. I especially like the little eyebrow on the little window.
Notice the diamond plate on the front and the upgrade to 2 propane tanks instead of one.

I am mainly in charge of sewing, painting, and clean up on this project, and now I have moved on to some interior painting. Remember the color scheme.

The light brown (paint chip on the left) isn't working out, but the little galley looks great in "green" and "cream." We aren't using the fabric in the upper right hand corner for the camper, but I did make it into an awesome skirt.  The other two patterns are curtains. 

I will post some interior pics in a later post. We need wall board (paneling) for most of the inside, and ceiling.   And flooring which we bought yesterday at Home ReSource for a great price. We love supporting them and always find the Perfect Thing.

I was painting the other night and a neighbor biked by and said we were doing a great job. Apparently he is a professional vintage camper restorationist, and that made me feel AWESOME to get a shout out. So here is a shout out to their company 
(I am pretty sure this is where he works, in East Missoula), 

He also told me (paraphrasing) that he enjoys seeing other people experiencing his own personal kind of hell, but I could tell he loves his work.  So I made him look at the inside of the camper, too! 


Monday, June 3, 2013

Outside the camper

We started painting the exterior.  David needed to take out and re-insert the rear window, so it seemed like the perfect time. Here is a Before shot:


And During: 
(can't say "AFTER" since this is just after the French Market aka "cream" color was painted on.  
The bottom color is going to be Beautiful Brown Eyes.)

We added this spiffy eyebrow to the back window, to help keep water from getting in. 
It looks pretty sharp.


And check out the two propane tanks, also painted French Market. 
But with silver to match the diamond plating on the front of the camper. 
And new security chains.
And the tongue is has been reconfigured to hold both tanks (it originally just had room for 1), 
plus a new coat of paint.

Raining yesterday and today, so no progress on painting. But good painting weather is in the forecast!


Thursday, May 30, 2013

Wiring and insulation

Long time, no post, but things are happening.  

After re-framing pretty much the whole trailer and 
attaching the outer skin to that framing, 
David ran wires throughout. 
He's also been insulating using perfectly cut-to-size panels of rigid insulation. This is really light weight and unlike the batting form of insulation, can contribute at least a little bit of structure to the camper.

Here's a view looking to the back of the camper.


So tidy and nice!

Here is some info on the wiring and electricity set up, in case you are interested in that kind of thing.
We bought a Deka 8A4D battery, which seriously cost almost as much as the trailer. (Keep in mind that we got the trailer at an auction for a great price, but STILL). It's a 200 amp hour battery, made in the USA. (You can one made in China for half price but we prefer to support US made products).


The battery isn't pictured here, but this is what you are looking at:

Top left: the fuse box.
Top right: the converter that converts 110v "shore power" to  12v "battery power" 
Bottom:  this is the outlet where the shore power enters, after it goes through a service panel with two 15 amp circuits. (That is probably more than we will need, but it is better to be safe.)
Notice the converter just plugs into it, and then the converter connects to the Deka battery (those wires aren't shown in the photo above).

One circuit from the fuse box runs into a 12v outlet so we have a place to charge phones and other little devices. The other circuits run to over head lights, under cabinet lights and a small fan. There is a circuit reserved for a little laptop for watching dvds or such (nighttime comes early half the year in Montana!).

The oven/stove/heater are all propane, so that isn't involved, and the fridge is literally just an icebox, so that isn't involved either.

I thought people might be interested in this because the old campers weren't set up to run off a 12v battery. Ours was set to connect to "shore power" and also had some propane appliances (lamps, etc, in addition to the stove and furnace).  When thinking about our future use of the camper, it's likely that we won't typically be camping somewhere with shore power.  

All the electrical "stuff" is mounted under the seats in the dinette. There is plenty of room down there, so lots of room to work, room for ventilation, and room for the potential addition of a solar powered system. 

****

Meanwhile I've been sewing. I finished the seat covers. It was a learning experience, and they look pretty good.  We ordered a 3/4 size bed (on the advice of people on the Tin Can Tourist site on Facebook, we went with this one  It's made in the US! And less expensive than ordering foam and fabric etc and making one yourself.)

Friday, April 26, 2013

A structural issue corrected

Here is the FRONT wall of the camper, the wall that gets all brunt of wind etc as the trailer rolls down the highway. This wall didn't appear to have any framing or insulation; just a sheet of painted plywood attached to the window via caulk. Not structurally sound.  So David took it off....

and confirmed the suspicions.  Nothing but external skin there. 


 So he added some fresh framing and voila, now there is room for insulation and a good means to secure the SIDES to the FRONT (you know, details).

And a good way to attach diamond plating to the front, which looks SUPER COOL and helps protect against rocks, etc. And David re-attached the window with better quality caulk and that special butyl tape.

 It is coming along.  Stay tuned.


Some small things coming along

I graduated from sewing square curtains on a borrowed machine to sewing heavy duty upholstery covers on my very own sewing machine. With homemade piping!  Thank you everyone who has ever posted a YouTube video about sewing piping and seat cushions. I think I watched them all.

I got my sewing machine from my favorite sewing store, Selvedge Studio. It is one of their "student" machines- they teach all manner of sewing classes there and sometimes the used machines come up for sale. Perfect for me. They are very supportive and helpful over there at Selvedge, if you are ever in Missoula you should stop in and buy something.  

Here's the first finished seat cover (yaaaaaay).  It looks like there's a big lump in it but I assure you it is just a harsh shadow from the camera flash.  Now I have 4 more cushions to go! They aren't all dark brown- the seats are dark brown, and then the back rest cushions are a faux cowhide pattern.  By the time I get to those, I'll be much more confident in my sewing.  I broke the sewing machine needle last night, which is something I'd always been afraid of. As it turns out, this is completely not a big deal and it takes about 30 seconds to change to a fresh needle.  Who knew.

By the way, look at that beautiful table the cushion is sitting on.  David made that- he has talent.

We took of the Grizzly Bear decal the other day.  It just took a little time with a hair dryer and a plastic scraper.  The camper looks much better without that. No offense to Griz Nation of course.

Monday, April 8, 2013

Back on track

By now David has exposed all of the water damage, and it was pretty much permeated throughout, but that's okay because it's better to know NOW and get it all fixed. When will we ever gut this camper again? Hopefully this is it.
Here is the back, aka Master Bedroom, with new framing.

Notice the lack of rotten wood.

David added a very slight "crown" to the ceiling framing, to help with draining. Check it out.


It's subtle. But hopefully it will make a difference in preventing pooling water.  
And speaking of water, the roof still isn't water tight:

The roof  "skin" is just about an inch short of meeting the side skin.  Maybe if one of use gets up there with a rolling pin we can press out the wrinkles and make it work. I'm serious.  I like this picture because it shows the hole-filling process that David has been working on during sunny weather. We had a week of gorgeous weather.

What else? Now that there is real framing inside, the outer skin can be attached to the framing! This is kind of a big deal for stability. Here David puts in some nice, fastening screws that do their job!

So quite a lot has been happening.  I had some projects, too, which I worked on during the flu days (I believe I mentioned that already).  My friend Mary loaned me her sewing machine and it was fun to make all those curtains.

This is one of 3 different curtain fabrics we used. There's a different one for the Master Bedroom, the Kitchen and the Dinette.


Natalie the Cat was extremely helpful.

 I enjoyed sewing these, so much that I bought a sewing machine. I got one of the used "student" machines from Selvedge Studio (a great store in Missoula). They were SO HELPFUL and the machine comes with a private "Get to know your sewing machine" class.  I got a heavy duty one so I can make new seat covers and even our awning. Good times! 

Saturday, March 23, 2013

Things just got a little worse


I'm not talking about the recent snow storm. I'm talking about water damage inside the trailer.
We thought all the water damage was in the front half of the trailer, but while dismantling the master bedroom, I mean bed frame, David found...


...more water damage.
It's not too surprising actually.

And better to find it now. So the demolition stage was extended.


Here it is with the paneling removed,

and here is a wider shot, so you get the full effect.


So that is happening. Meaning, David is out there working on it right now.

David has done 100% of the trailer projects this week. I have been out with the flu. It's an uncomfortable flu.  But today I hope to sew some curtains. My friend Mary loaned me her sewing machine, and I'm ready to go. Thanks everyone at FB Tin Can Tourists for the great replies and posts about your camper curtains.

I wondered (for about 2 seconds) whether there was anyone on Earth who would enjoy seeing all these water damaged interior photos. And after 2 seconds I realized.... TCTs want to see them!  Enjoy.

I'll close with some happy news- David bought an old and beautiful 20 cup coffee percolator for the trailer and it came today! Woot woot, Camper Coffee!