Sunday, December 24, 2017

All new insulation

We are far from being ready to insulate the whole camper.

But we need to put the "cylon" cabinet back in the bulk head.


David took it down to work on the window, remove old insulation, and repair/clean the clearance lights. He's also working on the wiring plan for the solar array, shore power, circuits etc.


 That cylon takes a up a lot of space, and it is hard to constantly work around when it's in the middle of the floor.


It feels like several things are happening simultaneously out there. Yet this seems like a good time to talk about the insulation.

Old insulation is pretty dry overall, yet some areas were completely ruined by mice. Fiberglass bats are always going to be mouse hotels, and while I don't dislike mice, I don't want them living in my walls and floors. The mouse urine smell was strong when we brought the Avion home. 


So all of the original insulation is out. Makes it easier and cleaner to redo every single thing in the camper, and just feels better knowing all the yuck is out.

Regarding insulation: There is a lot of info, and a lot of strong opinions out there on this topic. We looked at everything from spray-in foam to fiberglass bats to rigid insulation to a combination of these things.

David was already in the insulation mind-set prior to starting the Avion project.  He recently built a small walk-in cooler for hanging wild game at our house (inside his shop).  Because of climate change.

The goals for the Avion insulation are:good R value, insect/mouse resistant, easy to work with and install. Sidenote: For a good R value, you need air gap. since the walls are only 1.5 inches thick, there can only be so much air gap!

We went with Prodex insulation.  (For another discussion of Prodex insulation in campers, go  to Frank's Trailer Works Blog.

We are doing 2 layers of this: one against the outer skin, then an air gap that also accommodates wiring, and then another layer of Prodex.


The Prodex comes in a big roll and is really easy to work with. We measured the dimensions of the various bays in the camper walls, measured and cut corresponding pieces in our warm living room (Winston helped), and them taped them into place in the camper.


It was much easier than we anticipated to fit it into the curves of the bulkhead. One big rectangle over the window(no problem). For each side bay, which has a lot of curve, cut a rectangle that matches the width and the longest straight edge (in this photo above, that's the edge curving over David's head from the left).Set the bottom edge and the long straight edge in place.  Fold the sheet like you are making a bust dart (for you sew-ers and sewists out there), bringing the excess fabric toward you.  Then when you have all of the sheet you need pressed against the outer skin, simply cut off the excess "dart"material. Easy cheesy.

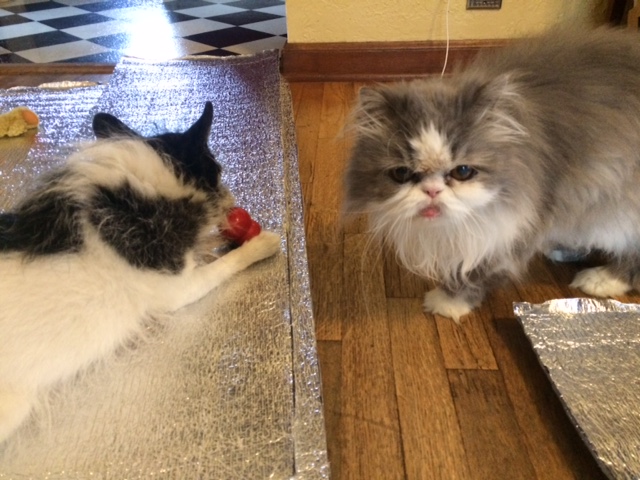
Verdict: easy to work with, not mouse friendly, and the pets love it:

Adding a grey water tank

The Avion doesn't have a grey water tank.  We've read that prior to 1972 or 1973, campers just didn't have grey water tanks.

With our current camper, the 1965 Security Traveler, we use an external 5 gallon carboy, connected to the sink drain with a small hose.  It works fine but it isn't ideal. Why? Because of grizzly bears.  Montana has a lot of grizzly bears.


And if it isn't the grizzly bears, it's the black bears.  Responsible camping means keeping your food waste, including grey water, out of reach of bears.  So every night, we put the carboy in the back of the truck.

Another problem is that the carboy full of grey water can freeze. And another is that it doesn't look fantastic, but that is the least of the concerns really.

For all those reasons, we want the Avion to have an enclosed grey water tank, away from bears and fairly protected from freezing.

The Avion does have a black water tank, but since it sits mostly above the floor height, it won't work as a grey water tank.  Once the water level filled up the few gallons BELOW floor height, it would start to back up into the shower. (Below: The toilet sits on top of the black water tank; toilet is removed for now but you can see several inches of the black water tank standing above the floor).

I advocated for taking out the toilet and black water tank completely, but for various reasons, that would not buy us any extra space, so those are staying.  (Well David took them out after this photo was taken, but they will eventually return).

Challenge: We needed to find a tank that fits the space between the camper floor joists and is also 4 and 3/4" deep (that is the distance between the floor and the belly pan).

Based on other people's blogs and FB discussions, we checked out Inca Plastics on line.  They are really helpful. You can download a catalog of all their various RV tanks from their website.


David measured, looked at options and then had some email with the company (they are very helpful).  We want a tank that sits here, in the upper right bay of floor joists:
In this photo you can see (clockwise) the waste pipe from the kitchen sink, the shower drain, the bathroom sink drain, an empty bay, and the hole where the black water tank used to be.  This is looking at the back of the camper.

Our choices for a water tank are either a 7 gallon tank (one of many standard sizes, fits in that bay), or 12 gallon tank (must be made by modifying a standard 14 gallon tank, would require cutting into one of the floor joists).  Since David knows how to weld, we think it will be ok to do the bigger tank (cut out part of the joist and then re-enforce it after the tank goes in). That joist needs some work anyway.

Another part of the challenge is to line up the waste outlets for the grey and black water.  We want the outside of the camper to remain as original as possible, so we don't want to add any new holes.  The original design and fabrication look pretty nice.


We will let you know how it goes.

Sunday, December 10, 2017

Refinishing cabinets

The birch cabinets are in pretty good shape. 

A few places will need to be repaired with new plywood and a few cabinet doors are irreparably damaged (including the doors below but you can't see the damaged side in the photo).


They are well built and sturdy, with mortise and tenon joinery and full length hinges.
Mostly the issue is the old shellac finish is yellowed and wrinkled and that won't do. 
We don't want to paint them.

It seems like this is the original clear shellac. 
I checked on line (including the Tin Can Tourist discussions on Facebook) to see what people are doing to refinish old cabinets.  Some people were saying that if the original finish is shellac, then you can wipe it down with denatured alcohol and it would be a good preparation for a fresh shellac, as long as you are going with a darker shade (like amber over transparent).

I tried that the denatured alcohol.  The results were not satisfying at all. It didn't look like the alcohol did ANYTHING.

So I tried Citristrip and it was beautiful:

Before and after. The light is weird so you don't get the full effect of the beauty but it is VERY satisfying.


I am excited to get stripping all of the cabinets! We moved them into the laundry room and I'll be working on it indefinitely. 
BTW, Citristrip label says to use mineral spirits for cleanup. I think that the denatured alcohol is a million times more effective and smells better too.


Next phase and a later post will be about the new shellac. We'd like a warmer color. Stay tuned and happy stripping!

Removing a stubborn vintage propane furnace

We keep this blog to share information with other camper renovators.  Most of what we have found about Camper Renovation comes from other people's blogs, and we want to participate in the community of knowledge.

Taking out the furnace has been quite a riddle. We weren't able to find a method from others that worked for this Duo Therm furnace:

Everything has to come out of the camper for the new floor and general clean up.  We want to keep the furnace and keep using it, but for now it needed to come out. Not easy. David kept looking for a final elusive screw, or finding the right way to wiggle or pull it out.

When we did our 1965 Security Traveler, and its Hydro Flame furnace, we had the same problem: STUCK.  David couldn't remove it, so it just stayed in place and and he worked around it.  Not ideal.

Searching online, we found several other people that ran into this problem with a variety of mid 50-70's campers, but there wasn't an easy solution. Many people ended up destroying the furnace while taking it out, or sawing through the exhaust ducting.  We didn't want to do that.  In general, everyone seemed to agree that they are just stuck with rust, and with enough wiggling and elbow grease you can get them out.  This one wasn't budging.  Just before resorting to the sawsall, we figured it out a solution. 

Part of the problem lies in the vent- there is no was to get your hands on the exhaust pipe because the vent (whether it is a Hydro flame or Duo Therm) blocks it.  

Here is how it worked.  The exhaust pipe goes through the wall to a vent, and the vent is covered like this:  


Even after unscrewing the vent cover from the outer wall, the heater didn't come out. So David drilled out the rivets on the vent cover, exposing the flange:
And hit that flange with a hammer. The exhaust pipe, previously stuck to the flange with rust, came loose.  And voila, the pieces came apart.  
(You can tell there was water leaking around the vent cover, which is why a previous owner put so much caulk around it).

Here is David with the whole furnace.

The rust that held the exhaust pipe to the flange was the only rusty part. The furnace looks great over all and we look forward to years of cozy camping in the Montanan mountains.

Wednesday, December 6, 2017

Vintage advertisements

Let's enjoy these previews of our Life with Avion

Dress code: elegant.

Carpet: Full shag.


Activites: cards and dancing Indians. 

Wait. What?


I think this ad is trying to convey all the exotic places the white family will visit on vacation.  
Cringeworthy.

ANYHOO, Our camper does have the original bathroom curtains, shower curtain and privacy door:


We'll replace these with something a lot less Vintage!
Thanks for checking in!

Saturday, December 2, 2017

New project: 1965 Avion Sportsman 18S

Excited to announce our  new project! David picked it up in Spokane this week and he got right to work taking it apart. It will be a total gut job on the inside, but the outside and framing are in great condition.


There is nothing wrong our current camper('66 Security Traveler). We love it and we use it all the time. Yet we've always wanted an Airstream of Avion type of camper, and this was a really good opportunity.  The Avion is just a little bit longer than the Security, and the Avion has a bathroom. 


I'm excited about having an indoor shower; neither of us are excited about the toilet. We usually camp where there are outhouses, or where we can set up a backcountry latrine; both options seem better than dealing with RV dump stations or toilet repair. Gross. I will probably sew a permanent seat cover for the loo and pretend it isn't there.

We (meaning David, mostly) are spending the weekend in Demo Phase.  Everything got sprayed down with a mild bleach solution because there were a lot of Mouse Houses and Smells, and no one wants to get Hanta Virus.


Old bed: OUT

Upper cabinets (all 3 sets): OUT

Subfloor: OUT!

The sink, floor cabinets, dinette, oven/stove, and fridge all came out too.My main contribution today was cleaning the fridge (we plan to sell it and replace with an ice box), and cleaning the sink, oven etc (not too dirty).

David got a lot done today and yesterday already. He needs some different drill bits pronto; apparently there are some unusual screws in various places.  We are keeping all the original "things" for now. Even if we don't re-use them (water damage, mouse smells) we can use them as templates for the new cabinets and furniture that David can make in his woodshop

Looking at the outside again:
Looks like there was some kind of incident here. It was badly patched but this is the only spot that has an issue on the outside. This is where the water heater was originally located (under the bed). However we are going to switch locations for the bed and the dinette, and to make room for legs and feet, David is moving the water heater towards the front of the camper. It will go in the spot where the luggage area is currently (you can see the access panel in this photo).

It is going to work out great. If you have ever patched the skin on an Avion with this kind of metal, leave us a comment on how it went.

Next time: See some vintage ads for this camper (holy smokes, they are strange).